Thursday 28 July 2011

Fresh From The Oven 7 - July 2011 - Posh Toasties.


What a brilliant challenge this month - really tasty Italian flatbread sandwiches - Piadina - with any filling of our choice.  Thanks to Alex of Dear Love Blog for this challenge.  She had spent time researching and trying to recreate a recipe that she had loved when she tried it in Milan when she was 15.  Well I'm so glad she did as this lovely little toastie is going to be a regular lunch around here.  The fillings ideas are endless so we can vary it and never get bored.  


This time, I made two fillings.  The first was spinach and nutmeg with Taleggio cheese and the second was roasted peppers with mozzarella.  I loved them both.  My next one is going to be one of Alex's ideas - gorgonzola, pear, rocket and walnuts.   Oh yum.  But really you can't go wrong with any cheesy filling so I'll just play about with whatever I fancy or whatever is in the fridge.


This recipe is made with olive oil instead of lard and it tasted perfect to me but you can just replace the oil with lard if you fancy.


My 3 year old took the above photo.  He is obviously going to be a food blogger!

Recipe - Piadina.
(Makes 8 flatbreads which will serve 4 people easily and probably 6 for lunch with a salad.)

Ingredients - 
500g plain flour
1 tsp bicarbonate of soda
1/2 tsp finely ground sea salt
100ml olive oil (or 100g lard)
200ml warm water.

Method - 
1. Place the flour, bicarbonate of soda, salt and olive oil in a large bowl.  Gradually add the water, stirring with loose fingers until the mix comes together to form a soft dough.  Turn out on to a lightly floured surface and knead until the dough becomes smooth and shiny, about 5-10 mins. (Okay, okay, I used my Kenwood Chef to do all of this for me!).  Divide into 8 equal balls, loosely cover with lightly oiled cling film and allow to rest for 30 mins.
2. Heat a non-stick cast iron skillet over a high heat for 5 mins.  (I just used my BBQ because it was a nice evening.)  On a well floured surface, flatten each ball and roll out into a disc 2-3 mm thick. Prick all over with a fork.  Place a disc of dough flat in the centre of the pan and press down gently.  Cook for 2 mins or until the dough is crisp and brown and brown spots begin to appear, then flip and repeat on the other side.  Cook the piadina one at a time until all the dough is used.  Cover with a clean tea towel to prevent them drying out while you prepare your filling.
3. Place one piadina on the bottom, cover evenly with filling and top with another.  If you like your fillings cold, cut into wedges and serve.  Altenatively heat through in the ven or sandwich press and serve hot. (I cokked four pieces of dough on the BBQ then with the others, I cooked one side, flipped over, added my filling and one of the cooked piadinas thereby letting the filling warm through while the bottom of the piadina was cooking).


Wednesday 20 July 2011

The Cake Slice Bakers - Challenge 10 - July 2011 - Zebra Cake.


Ha ha - that's going to be confusing - a picture of an owl cake with the title 'Zebra Cake'.  I had to make an owl cake for Rufus' 3rd birthday and since I had to make a zebra cake for The Cake Slice Bakers, I thought I would combine the two.  

I have never made a zebra cake before.  My first attempt didn't work at all.  I must have put too much cocoa powder in the chocolate layer so the batter was much more dense than the vanilla layer and consequently just sunk to the bottom instead of spreading out to form the stripes.  For the second attempt, I kept back some of the flour from the original batter and mixed it into the vanilla half when I mixed the cocoa into the chocolate half.  This worked much better.

My stripes weren't as defined as I would have liked so next time I make it, I will do larger dollops of the mixture to make each stripe.  I did about 3 tbsp vanilla to 2 tbsp chocolate in this one and you can see it makes the stripes too thin to be very distinct.


I was very pleased with the cake.  It had to compete with a layer of chocolate ganache and then fondant as it ended up being a party cake.  It was moist and light, though, and I preferred it to my usual chocolate cake that I do for novelty cakes.  It seemed to go down well with guests at the party too.  I didn't manage to get any pretty pictures it sliced as we were obviously busy with the party.  I would be happy to make it again, though, and certainly want to try making bigger, more defined stripes next time.


Recipe - Zebra Cake - adapted from Cake Keeper Cakes by Lauren Chattman.

Ingredients - 
2 cups plain flour
1 tbsp baking powder
1/4 tsp salt
4 large eggs
1 cup sugar
1 cup whole milk
1/2 cup butter, melted and cooled (113g)
1/2 cup vegetable oil
2 tsp vanilla extract
2 tbsp cocoa powder

Method - 
1. Preheat oven to 350F/180C.  Grease a 9" round cake pan, line with a circle of parchment paper, grease the parchment, and dust with flour.  Combine the flour (keep back 2 tbsp of flour to add to the vanilla portion later to keep the batter consistencies similar), baking powder, and salt in a medium bowl.
2. Combine the eggs and sugar in a large mixing bowl and beat with an electric mixer until thick and pale, about 5 mins.  With the mixer on low speed, stir in the milk, butter, vegetable oil and vanilla, scraping down the sides of the bowl once or twice as necessary.  Stir in the flour mixture 1/2 cup at a time.
3. Transfer 1/3 of the batter into another bowl and whisk in the cocoa powder. (Whisk the extra 2tbsp flour into the vanilla portion).
4. Place 1/4 cup of the vanilla batter into the centre of the cake tin and let it stand for a few seconds so it spreads out slightly.  Place 2 tbsp of the chocolate batter right on top of the vanilla and wait another few seconds until it spreads.  Continue, alternating vanilla and chocolate, until you have used up all of the batter and it has spread to the edges of the pan.
5. Bake until the cake is set and a toothpick inserted into the centre of the cake comes out clean, about 40 mins.  Cool in the pan for 10 minutes.  
6. Store uneaten cake in a cake keeper or wrap in plastic and store at room temperature for up to 3 days. 

Click here to see the CSB blogroll.

And click here to see how it should look! Beautiful. 

Tuesday 19 July 2011

Owl Party!


My wee one wanted an owl cake for his 3rd birthday.  I had been collecting pictures of octopus cakes as I was sure he was going to ask for an octopus cake.  Oh well.


I copied the design from the book - Cake Decorating Motifs by Sheila Lampkin.  She gives step by step instructions for more than 150 designs for using fondant icing.  I have used this book a lot since getting it and it has never failed me.  Love it.


I also made some cupcakes which I copied from Hello Cupcake! I simplified mine to save a little time.


And, of course, I made owl cake pops from Bakerella's book.  I am very proud of these.  They were very time consuming, though, so I made most of them without the wings.


I must also mention the gorgeous bunting which you can see in the top photo - this is from Especially For and I got really cute personalised printed owl party bags from Funky Dory Party Bags.


Thursday 14 July 2011

The Daring Cooks' Challenge No. 8 - July - Spätzle.


Steph from Stephfood was our Daring Cooks' July hostess.  Steph challenged us to make homemade noodles without the help of a motorized pasta machine.  She provided us with recipes for Spätzle and Fresh Egg Pasta as well as a few delicious sauces to pair our noodles with!

I have made pasta before but had never heard of spätzle before so I decided to concentrate on making this.  According to Wikipedia (so I am happy to be corrected if this is not right), spätzle is a traditional dish of areas around Bavaria, Austria and Hungary.  Spätzle translates as "little sparrow" and is thought to be so-called because the little rustic hand-shaped nuggets are thought to resemble little sparrows.   

I started off by making Steph's family recipe for spätzle with butter and breadcrumb sauce. This makes lovely rustic little nuggets of what I would say is a cross between pasta and our traditional doughballs (which we make with four and suet).

The breadcrumb dressing gave a fantastic contrast in texture to the doughy pasta and with plenty of garlic we loved this quick and easy meal.


I then decided to try making the spätzle the slightly more modern way into noodle shapes using a spätzle press (or a potato ricer).  Unfortunately it has been so long since I used my ricer that I didn't put it together properly and found the whole process so very frustrating, not realising I had missed out part of it until I was finished.  I will have to try again to see if I can make better looking noodles.

I decided to go more along the lines of a Hungarian dish and served the spätzle with a beef paprikash (recipe from Good Food).


Recipe - Spätzle - Steph's Dad's.
Serves 4.

Ingredients - 
2 large eggs
½ cup (120 ml) buttermilk
1½ cups (360 ml) (210 gm) (7½ oz) plain flour
up to 1 tablespoon (15 ml) of herbs and spices 
(optional – I added some cayenne and herbes de provence)
1 tablespoon (15 ml) (3 gm) fresh parsley, chopped 

Method - 
1. In a large bowl, whisk together eggs, milk and any herbs and spices that you want to incorporate into the spätzle.
2. Incorporate the flour in small batches, by sifting in a small amount at a time and mixing until the flour is completely integrated. Keep adding flour until the dough becomes elastic, smooth and very hard to stir.
3. Boil a large pot of water. Dip a table spoon into the boiling water to wet it. To form the spätzle, fill the tablespoon about half way with dough, and release into the boiling water.
4. Boil for 15 to 20 minutes.
5. Drain the water from the spätzle. Because it's full of fun craters where water can hide, you will need to drain it especially well. Toss with the chopped parsley.
6. Plate, and dab a bit of the sauce on each spätzle. Don't add too much – it's really more of a light dressing than a sauce.


Recipe - Butter and Breadcrumb Sauce - Steph's Dad's.

Ingredients - 
6 tablespoons (90 ml) (85 gm) (3 oz) butter (I actually used 4 tablespoons of butter and 2 tablespoons olive oil, and it worked well)

½ cup (120 ml) (30 gm) (1 oz) fresh breadcrumbs OR ½ cup (120 gm) (60 gm) (2 oz) dry breadcrumbs (either variety can be used)
salt and pepper, to taste

Method - 
1. Melt the butter... this can be done in the microwave, or on the stove. 
2. Mix in the breadcrumbs. If needed, gently heat further (especially if you store breadcrumbs in the
fridge or freezer)
3. Season to your taste.


I'm really glad to have made these dishes.  The spätzle makes a very satisfying meal.  It has a very nice bite to it - a little bit chewy - and goes very well with the goulash.  I will certainly make it again.  So quick and easy to do too.  It has also inspired me to make doughballs again - will be making some of these for stews once we head in to the Autumn.

Wednesday 13 July 2011

Random Recipe 6 - Favourite Cookbooks.

Dom asked us to choose our favourite cookbook and randomly select a recipe from it for this month's Random Recipe Challenge.

Picking the books was easy.

My favourite cookbook is Appetite by Nigel Slater.  I spoke about my love for this book in this post.


Steve's favourite book is Moro by Sam and Sam Clark.


We got the kids to choose our random recipes for us.  My page was number 252 which was grilled vegetables.  One of Nigel Slater's ideas for using them was as part of antipasto.  Steve's page was 36 which was ideas for putting together mezze.  I sense a theme and I imagine Dom is going to accuse us of cheating.  Well I did cheat a little bit - the first page Adam selected for me in Appetite was a lovely looking recipe for lamb shanks but I didn't have time to order them from the butcher and the recipe also uses an entire bottle of rioja so I thought I would keep the recipe for a time when the kids are away and make a special meal for the two of us. Sorry.

We made our meals this weekend.  Steve made mezze for lunch and I made antipasto for tea.

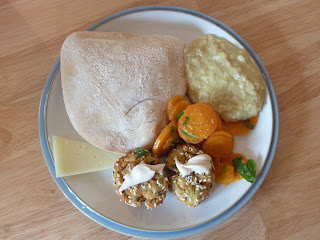
Lunch was wonderful!  Steve chose to make flatbreads, baba ghanoush, falafel and carrot and cumin salad.


They went together really nicely to give quite a special lunch.  It did take him all morning to put together, though so full marks for effort.  


Recipe - Flatbread from Moro.
Makes 4 breads.
Steve makes this recipe a lot - nothing beats freshly made bread.


Ingredients - 
200g strong white bread flour
1/2 tsp fine sea salt
1/3 level teaspoon dried yeast
170ml tepid water
1 tbsp olive oil

Method - 
1. Place the flour and salt in a large mixing bowl.  Dissolve the yeast in the water and then pour the oil into the water.  Now pour the water into the flour a bit at a time while mixing.  We like to do this by hand, squelching out the lumps as they appear.  When all the water is added, transfer to a floured surface and knead well.  If the dough is sticky, add a little more flour; if it is still crumbly add a little more water. Continue kneading for about 5 mins until the dough is ever so slightly tacky but soft, elastic and smooth. Set aside to rest for 45 minutes on the floured surface covered by a cloth.
2. Preheat the oven to 230C/450F/GM 8.
3. Divide the dough into four, and roll into balls.  On a generously floured surface, with a rolling pin gently roll each ball to approximately 3-5mm thick, making sure the shape is a rough circle about 15-20cm in diameter or oval about 15cm in length.  Place on a flat, oiled baking tray and bake in the top of the oven for about 5-10 mins.  Each bread should partially bubble up and colour slightly yet not be totally crisp.

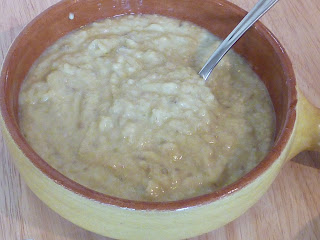
Recipe - Baba Ghanoush from Moro.
Serves 4-6.
I absolutely devoured this - perfect with the flatbread.


Ingredients - 
3 large aubergines, about 750g - 1kg in total
2 garlic cloves, crushed to a paste with 1 tsp salt
juice of 1 lemon
3 tbsp tahini paste
4 tbsp olive oil
sea salt and black pepper

Method - 
1. Pierce the skins of the aubergines to prevent them from exploding and grill whole over a hot BBQ, directly on the naked flame of a gas hob, or under the grill until the skin is charred and crispy all over and the flesh is very soft.
2. When cool enough to handle, discard the tops and peel off the skin, scraping the flesh from the back of the skin if necessary.
3. Place the flesh and any juices in a large mixing bowl and either whisk or beat by hand until almost smooth.  Add the garlic, lemon juice, tahini and olive oil, stir in and taste for seasoning.


Recipe - Carrot and Cumin Salad with Coriander.
Serves 4.
Everyone knows how well carrot and cumin go together.  This one was a hit with the kids and was actually very refreshing.


Ingredients - 
450g carrots
2/3 tsp cumin seeds
1 garlic clove
juice of 3/4 lemon
1/3 tsp caster sugar
1 tbsp olive oil
1 small bunch fresh coriander leaves, roughly chopped
sea salt

Method - 
1. Peel the carrots and boil whole in salted water until they are tender.  Drain the carrots, spreading them out to cool and dry before slicing quite thinly.
2. To roast the cumin seed, place in a small saucepan and stir over a medium heat until you notice the colour beginning to change (about 2 mins).  Pound the cumin in a mortar and pestle, then add the garlic and 1/2 tsp salt and pound some more.
3. Mix the lemon juice, sugar and olive oil into the garlic mixture.  Now toss the carrots in the cumin dressing with the coriander leaves.  Serve at room temperature.


Recipe - Falafel from Moro.
Serves 4.


Ingredients - 
250g dried fava beans, soaked overnight (Steve used dried chickpeas)
3 garlic cloves, crushed to a paste with salt
1 large bunch fresh coriander, roughly chopped
1 medium bunch fresh flat-leaf parsley, roughly chopped
1 1/2 tsp cumin seeds, roughly ground
1 tsp coriander seeds, roughly ground
1/2 onion, grated
50g chickpea flour or plain flour
1 egg
1/4 tsp bicarbonate of soda
750ml sunflower oil for deep-frying
4 tbsp sesame seeds
sea salt and black pepper

Method - 
1. Drain the beans well and place half of them in a large saucepan.  Fill with fresh cold water and bring to the boil.  Reduce to a gentle simmer and cook for 5-10 mins or until tender, skimming off any scum as it builds up.
2. Meanwhile, place the raw beans in a food processor and pulse until more or less smooth.  Transfer to a mixing bowl and repeat the process for the cooked, drained beans.
3. Add the garlic, coriander, parsley, cumin and coriander seeds, onion, flour, egg and bicarbonate of soda.  Mix well and season with salt and black pepper to taste.
4. Shape into balls no larger than a walnut, the gently flatten each one into a disc about 2cm thick, 5cm in diameter, making sure the edges don't crack.  Place the sesame seeds on a plate and dip the falafel until coated all over.
5. Heat the oil in a large saucepan and when the oil is hot but not smoking, add the falafel in batches.  Fry until golden brown on both sides, remove and drain on kitchen paper.


So, then onto my antipasto.  I was to make roasted peppers and roasted aubergine and I decided to serve it with lots of bought things as recommended by Nigel himself - Parma ham, crostini with bought tapenade and some olives (and watermelon because we had some leftover).


I charred 4 red peppers but the yield from them was pathetic so I sent Steve out to get me a jar of roasted peppers to supplement mine.  So basically, this was a meal bought from the supermarket and the only thing I added was some roasted aubergine.  Well, the aubergine was lovely - but hardly a great effort from me.  Steve was most put out that I hadn't bothered to make my own tapenade and when I thought about it, I realised it really was a poor show!  Steve's comment was, "Are you joining a new group? The Daring Shoppers?"  Hmmm - I guess I deserved that.  


Here is Nigel Slater's very nice recipe for the grilled vegetables.

Recipe - Grilled Vegetables For A Salad, Light Lunch Or Antipasto by Nigel Slater from Appetite.


Ingredients - 
red peppers - 1 per person (I would say 3 or 4 - or, better still, buy a jar!)
olive oil
aubergines - a large one will be enough for 2 people
herbs - a few soft-leafed ones such as basil and oregano (I used basil, lemon thyme and parsley as that is what is good in my garden just now)
garlic - a clove per person
lemon - half a small one per person

Method - 
1. Set the oven to 200C/GM 6.  If the peppers are particularly plump, slice them in half; smaller ones you can cook whole.  Put them in a roasting tin or baking dish, drizzle with a little oil and bake until their skins are blackened and their flesh soft - about 30 to 50 minutes.  Leave then until they are cool enough to handle, then seed and skin.  Save any juices that come out.
2. While the peppers are cooking, put a ridged grill pan over a low to moderate heat and wipe and slice the aubergine.  Aim for slices no thicker than your little finger.  Brush the aubergine with a little oil, grind over a little salt and place them on the grill.  After 3 or 4 minutes they will be starting to brown.  Turn them over and let the other side cook till it is golden, with deep black lines on it from the grill bars.  These are what will give the aubergine a smoky flavour.  Each slice should be crisp on the outside and juicy in the middle - it is essential that they are cooked right through to the centre.  
3. Remove the aubergine from the grill and place them in a serving bowl.  Tear up a small handful of herbs.  Scatter them, along with the peeled and thinly sliced garlic, over the aubergine.  Generously crumble some sea salt and grind some black pepper over the vegetables, then drizzle with olive oil, any of the sweet, reddish-brown cooking juices from the peppers and some lemon juice, gently tossing them around with the herbs as you go.  Drizzle the peppers with the same dressing.  Set aside until the vegetables are at room temperature.

So, there you go - a most definite win for Steve.  I won the Nun's Farts, the Praised Chickens was a draw given that we collaborated and Steve magnificently won the battle of the small dishes.
So, 1-1 as we move into the next round.  I am looking forward to finding my fighting spirit again. 

Tuesday 12 July 2011

4th Of July.


I know this is very late but we just went to a 4th of July BBQ this weekend.  
I did a strawberry cheesecake - recipe from BBC Good Food.  I put my strawberry puree in between the buttery biscuit base and the cheese layer so I could make the top look like the US flag.  I was quite pleased with the result!

I also make cupcakes - colouring the batter and layering.  I stole the idea for these cakes from here.


Lastly I tried to make red, white and blue striped strawberries but they didn't work out as well as I had hoped.


Carolyn from Cookin' For My Captain did a better job than me and gave me the idea.

And, no, I have no links to the great US of A other than having a Texan friend who has a BBQ every year but I am more than happy to join in the fun - any excuse for a BBQ with good friends and some frivolous dessert making!

Tuesday 5 July 2011

Lazy Mummy Chicken.


The reason I have called this Lazy Mummy Chicken is that I used a packet of instant cous cous from the supermarket - you know - pour over some boiling water and it's done.  And, yes, I know that that it is how normal cous cous is done but this way I get all the flavourings already added without even so much as chopping some mint leaves.

And I make no apologies at all.  After all, looking after wee ones is hard work and I did debone the chicken thighs myself!  So I fully deserved to have a cup of tea made for me afterwards while I put my feet up.  

But, seriously, I got this recipe for minty yogurt chicken from  This Is What I Eat and I am very grateful as it is a lovely little recipe.  The boys ate it all up, it was quick and easy to put together and it was VERY tasty.  What more could you want?  (Apart from someone to make you a cup of tea while you put your feet up?)