Wednesday, 30 March 2011

My First Bento Box.


I got the Yum-Yum Bento Box book by Crystal Watanabe and Maki Ogawa for my birthday from the boys.  Prior to that I had bought The Just Bento Cookbook by Makiko Itoh (see her blog here).  I have been itching to try making these cute little packed lunches for myself.  I am frankly amazed, however, at the lengths some Mums go to to make beautiful looking lunches for their kids.  When my two go to school, they will be getting a cheese sandwich and an apple like everyone else!


You may have seen my beautiful totoro bento boxes in a previous post.  We are totoro daft in this family.  In fact, Kei introduced us to My Neighbour Totoro and we now have a cupboard full of Studio Ghibli films and loads of toys, T-shirts, whatever we can get our hands on!  

I also got to treat myself to a few bits and pieces for making fun Bento boxes as part of my birthday present.  I got a few things from J-List.


Of course, I started off with a very basic Bento box to let me dip my toe in the water.  I basically just made some onigiri into the shape of fishes.  Here is a great page from the basics section on Just Bento.  Beware, though, I can spend days and days looking through this blog.


I simply served the onigiri with cucumber and carrot sticks and Jumbo prawns.  I also included a wee bottle of soy sauce and a little tub of Marie Rose sauce.  The boys definitely loved the novelty of the way the lunch was packed for them.  We ate them at the kitchen table, though - ha ha - not hugely adventurous!


Now, as this post is relevant to Japan, if you want to help the people on Japan rebuild their lives following the earthquake and tsunami, have a look at Bento 4 Japan.  There are auctions where you can get great items if you want to start having a go at making your own Bento boxes or for us in the UK, you can donate to Justgiving which gives you a chance of winning the raffle to win some lovely Bento stuff.

Tuesday, 29 March 2011

Salted Peanut Chocolate Fudge Brownies.


I actually had some peanut butter chips left over from making my Lion Cake Pops and half a packet of salted peanuts languishing in the cupboard.  So that was all the excuse I needed to make these!

I did make the peanut butter frosting which was nice but I think was a little too much and detracted from the beautiful brownies so we ended up scraping most or all of the frosting off and just eating them bare.

The brownies are so fudgy and melting then the salty peanuts come in with a crunch - beautiful.
Thanks for the recipe Reeni.


Monday, 28 March 2011

Fresh From The Oven 5 - March 2011 - Oatmeal Bread.


This month Helen from Fuss Free Flavours gave us a really different challenge.  She basically let us make whatever we wanted but we had to use flour that we knew either where it was grown or where it was milled.  In other words, supporting local, small growers and millers.

I didn't successfully locate a flour local to me but as soon as I saw the challenge I thought of The Oatmeal Of Alford.  This is a staple of my kitchen cupboard and we use it for loads of things.  Best of all, the oats are grown in Laurencekirk just a few miles south of Aberdeen and then milled at Montgarrie Mill in Alford, just a few miles west of Aberdeen.  Very local.


I thought that there would be loads of bread recipes with oatmeal as a main ingredient but my cook books didn't have any.  They had bread made with flour and then some oats scattered over the top and they called it oat bread.  Not what I was looking for.  So I went to The Oatmeal Of Alford Website and, of course, they had a recipe for Oatmeal Bread.  

I would just like to point out that I have no connections at all to this company and am not sponsored by them.  I have used their oatmeal all of my life, though.


So, I made two loaves.  They didn't rise a lot and seemed a little dense, but, toasted, it is a lovely bread.  It has a really wholesome nutty flavour.  Spread with the fancy butter with the big chunks of sea salt - mmmmmmmmmmmmmmmm.

Loved the challenge - thanks Helen.  I now have a new, easy, bread recipe using a local, healthy ingredient.  I will also continue to be on the look out for other local ingredients and producers.


See here for a round up of how the others fared at finding local flours and what they made with them.

Sunday, 27 March 2011

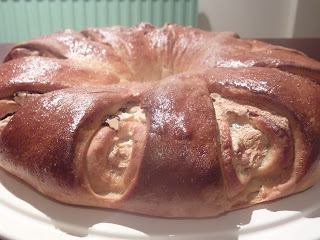
Daring Bakers' Challenge No. 5 - March 2011 - Yeasted Meringue Cake.


The March 2011 Daring Baker's Challenge was hosted by Ria of Ria's Collection and Jamie of Life's A Feast.  Ria and Jamie challenged The Daring Bakers to bake a yeasted Meringue Coffee Cake.


And, in case you get confused like me - no, there is no coffee in this cake.  I scoured the ingredients time and time again thinking I was missing something but apparently a coffee cake in this sense is one to be eaten alongside a cup rather than flavoured with coffee.


I was intrigued by the meringue in the cake. It turns out that it cooks into a chewy meringue in the bits that are exposed by the cuts in the dough whereas elsewhere it simply disappears leaving a sweet moisture within the cake.


I made my one with Jamie's version which included pecans, cinnamon and chocolate although I changed the pecans to almonds as that is what I had in the house.  


I ended up with something which very reminded me of something from a French patisserie - a bit pain au chocolate and a little bit Danish.


I think I should have put a little more chocolate in my one as I found it a little bit dry but Steve enjoyed it.  I was also inspired by other Bakers versions and would like to try a savoury version.  According to Audax (who made many versions - some rather surprising - check out the one made with sweeties!) the cheese and meringue mix to make a lovely gooey, oozy sauce.  I also liked versions made with apples and sultanas - yum.  Definitely one to try again with different fillings.

Recipe - 
Makes 2 cakes.

Ingredients - 

For the dough - 
600g plain flour
55g sugar
3/4 tsp salt
7g active dried yeast (I just bunged in a lump of fresh yeast)
180ml whole milk
60ml water
135g unsalted butter at room temperature
2 large eggs at room temperature

For the meringue - 
3 large egg whites at room temperature
1/4 tsp salt
1/2 tsp vanilla extract
110g sugar

For the filling - 
110g flaked almonds
2 tbs granulated sugar
1/4 tsp ground cinnamon (I used more)
170g plain chocolate chips (I just used what I had which probably wasn't as much as this and I think it really needed the full amount)

Egg wash - 1 beaten egg.

Method - 
1. In a large mixing bowl, combine 230g of the flour, the sugar, salt and yeast.
2. In a saucepan, combine the milk, water and butter and heat over a medium heat until warm and the butter is just melted.
3. With an electric mixer on low speed, gradually add the warm liquid to the flour/yeast mixture, beating until well blended.
4. Increase mixer speed to medium and beat for 2 mins.  Add the eggs and 150g flour and beat for 2 more mins.
5. Using a wooden spoon, stir in enough of the remaining flour to make a dough that holds together.
6. Turn out onto a floured surface and knead the dough for 8-10 mins until the dough is soft, smooth, sexy and elastic.
7. Place the dough in a lightly greased bowl, turning to coat all sides.  Cover the bowl with plastic wrap and a kitchen towel and let rise until double in bulk, 45-60 mins.
8. Prepare your filling.  In a small bowl, combine the sugar and cinnamon.
9. Once the dough has doubled, make the meringue.  In a clean mixing bowl (ideally plastic or metal so the egg whites adhere to the side), beat the egg whites with the salt, first on low speed for 30s then increase to high and continue beating until foamy and opaque.  
10. Add the vanilla then start adding the sugar a tbsp at a time as you beat until very stiff, glossy peaks form.
11. Assemble the cake.  Line 2 baking sheets with parchment paper.
12. Punch down the dough and divide in half.  On a lightly floured surface, working one piece of dough at a time, rollout the dough into a 20"X10" rectangle.  
13. Spread half of the meringue evenly over the rectangle up to about 1/2" from the edges.  Sprinkle half the sugar/cinnamon mixture over the meringue followed by half the nuts and half the chocolate.
14. Now roll up the dough from the long side.  Pinch the seam closed to seal.  Very carefully transfer the filled log to one of the lined baking sheets, seam side down.  Bring the ends of the log around and seal the ends together, forming a ring, tucking one end into the other and pinching to seal.
15. Using kitchen scissors, make cuts along the outside edge at 1" intervals.  Make them as shallow or deep as desired.
16. Repeat with the remaining dough, meringue and fillings.
17. Cover the cakes with plastic wrap and allow them to rise again for 45 to 60 mins.
18. Preheat the oven to 350F/180C.
19. Brush the tops of the cakes with egg wash.
20. Bake in the preheated oven for 25-30 mins until risen and golden brown.
21. Remove from the oven and slide the parchment paper off the cookie sheets onto the table.  Very gently loosen from the paper and slide onto cooling racks.  Allow to cool.
22. Just before serving, dust the tops with icing sugar and cocoa powder.  Best eaten fresh the same day or the next day.

Sunday, 20 March 2011

The Cake Slice Bakers - Challenge 6 - March 2011 - Chocolate Cream Pound Cake.


Any kind of chocolate cake always goes down well here.  The boys helped make this one and thoroughly enjoyed licking the spoons/bowls/everything going.
As you can see, I opened the oven too early so the cake sank in the middle but apart from that it is a very nice and easy chocolate cake.  We made it the day before I went away for a two day course and it was all gone by the time I got back.  Should have made two!


Recipe - Chocolate Cream Pound Cake (adapted from Cake Keeper Cakes by Lauren Chattman)

Ingredients - 
6 tbsp cocoa powder
1/4 cup double cream
1 cup plus 2 tbsp plain flour
1/4 tsp baking soda
1/4 tsp salt
4 oz unsalted butter, softened
1 1/2 cups sugar
3 large eggs
1tsp pure vanilla extract

Method - 
1. Preheat the oven to 325F/170C/GM 3. Grease a 9" by 5" loaf pan and dust with flour.
2. Sift the cocoa powder through a fine strainer and into a heatproof bowl.  Place the cream in a microwave safe jug and heat until just boiling (30-60s).  Pour the hot cream over the cocoa and stir and mash with a spoon to make a thick paste.  Set aside to cool.
3. Combine the flour, baking soda, and salt in a medium mixing bowl.
4. Combine the butter and sugar in a large mixing bowl and cream with an electric mixer on medium-high speed until fluffy, about 3 mins.  Beat in the cocoa powder paste until smooth.
5. With the mixer on medium-low speed, add the eggs one at a time.  Stir in the vanilla.
6. Turn the mixer to low speed and add the flour mixture 1/2 cup at a time.  After the last addition, mix for 30s on medium speed.
7. Scrape the batter into the prepared pan and smooth the top with a rubber spatula.  Bake the cake until it is firm to the touch and a toothpick inserted in the centre comes out clean, about 1 hour and 10 mins.  Let the cake cool in the pan for 5 mins, invert it onto a wire rack, and then turn it right side up on a rack to cool completely.  Slice and serve.
8. Store uneaten cake in a cake keeper or wrap in plastic and store at room temperature for up to 3 days.


See other bakers' versions at The Cake Slice Blogroll.


Saturday, 19 March 2011

Packed Lunch Ideas 1 - Rice Noodle Salad.


As I only work out of the home two days a week, I never really bother about my packed lunch - it's ham sandwiches week in week out!  I have, however, bought cute Totoro Bento boxes from J-List (we love Totoro but obviously Studio Ghibli stuff has a price tag!).  I haven't made any traditional Bento boxes yet but I do have a couple of books and will venture into that soon.

In the meantime, I made the rice noodle salad from Gordon Ramsay's Healthy Appetite to fill the Bento boxes for Steve and I to take to work.  A nice change from the sandwiches.  I didn't have any rice noodles so I just used normal ramen and it was a lovely light, tasty lunch.   I have to say, it did actually feel very healthy too.  Hopefully, I'll keep this up and make more effort with the packed lunches. And, needless to say, I made it the night before and made enough for our tea with leftovers for lunch the next day. 


I really like this Healthy Appetite book.  Got it from my Mum for a Christmas or birthday.  Full of very easy recipes and presented well - clear and fresh.

Recipe - Rice Noodle Salad with Prawns and Thai Dressing.
Serves 2-3

Ingredients - 
100g thin rice noodles
drizzle of sesame oil
200g mangetout or sugar snaps
1 large red pepper
1 large yellow or orange pepper
2 spring onions
200g peeled, cooked prawns
handful of coriander leaves
1 tbsp toasted black or white sesame seeds, to sprinkle

Dressing - 
1 shallot, peeled and finely diced
2 garlic cloves, peeled and crushed
1 small red chilli, deseeded and finely chopped
2-3 tbsp lime juice, or more to taste
2 tbsp fish sauce
1 tbsp light soy sauce
2 1/2 tbsp palm sugar (or soft brown sugar)
2 tbsp toasted sesame oil

Method - 
1. Bring the kettle to the boil.  Place the rice noodles in a large heatproof bowl and pour on boiling water, ensuring that the noodles are fully immersed.  Cover the bowl with cling film and leave to stand for 5 minutes or until the noodles are tender but still retaining a bite.  Drain and immediately toss with a drizzle of sesame oil to stop them sticking to each other.
2. In the meantime, blanch the mangetout in a pan of boiling water for 2 mins until they are just tender but still bright green.  Refresh in a bowl of iced water, then drain well.  Cut the mangetout on the diagonal into 2 or 3 pieces.  Halve, core and deseed the peppers, then cut into long thin slices.  Trim and finely slice the spring onions on the diagonal.
3. For the dressing, put all the ingredients into a bowl and whisk lightly to combine.
4. Put the prawns, spring onions, mangetout and peppers into a large bowl and add the drained noodles, coriander leaves and sesame seeds.  Pour the dressing over the salad and toss well to coat.  Eat immediately or chill until ready to serve.


Wednesday, 16 March 2011

Belleau Kitchen Random Recipe Challenge 2 - Part 2.


Hi, this is Steve – Lou’s better half. I have been involved in the Belleau Kitchen random recipe challenge and have actually found it very interesting in that it’s made me make things from our cookery books which I would balk at as being outwith my comfort zone. It’s like when you have loads of books that you keep meaning to get around to reading but never do and then end up donating them to charity because you have no room left in the house. I feel I’m finally getting value for money!
Anyway – about the recipe: the pesto bread was fine, but not mind-blowing. I do make quite a bit of bread but have never tried mixing pesto into the dough. I used jarred pesto so it may have tasted a bit sharper if I had either made my own or even just bought some fresh pesto.
To be honest, I prefer a bit more texture in my bread and the pesto bread didn’t really have this. It might go very well with pasta and sauce, given the similar type of flavourings.


Recipe
Pesto Bread – for 2 loaves
20g fresh yeast
500g strong white plain flour
1-2 tsp salt
250ml warm water
2 tbs olive oil
100g pesto
Activate the yeast in the water – should take no more than 10 minutes. In the meantime, mix together the flour and the salt. Then, add the water and yeast, the olive oil and the pesto. Bring together until all combined and then turn out onto a work surface and knead. Once the dough is quite velvety and smooth, put it in an oil-lined bowl and cover. Leave to rise for about 1 ¼ hours. After it has risen, knock the air out gently and then divide the dough in two. Place on a baking tray, cover and leave to rise for about ½ hour. Pre-heat the oven to gas mark 8. Once risen for the second time, put in the oven and immediately turn down the heat to gas mark 6. Bake for 30-40 minutes. When ready, the bottom of the bread should sound hollow when tapped (apparently).


Tuesday, 15 March 2011

Belleau Kitchen Random Recipe Challenge 2 - Part 1.


Steve joined me for this challenge again but we weren't as organised as last time when we cooked together.  I have, however, managed to persuade him to write up his own challenge so he will be guest posting here tomorrow.

This month Dom told us that we had to count along our bookshelf and choose recipe book number 18 and pick a random recipe from there.  Our book number 18 was The New Penguin Cookery Book by Jill Norman.  This is one of these very useful books that will have a recipe for just about anything traditional you care to look up.  This would be an excellent book for someone learning to cook.  And of course, although we do use it quite regularly, we haven't cooked a fraction of the many many recipes in here.


The page Steve randomly opened for me had some onion recipes on it.  The first couple were side dishes and the last one was onion tart.  I decided to go with the tart recipe so it would do a meal without too much thinking on my part!  This is a recipe for a basic onion quiche.  Nice, simple, family food and actually very tasty and satisfying.  I made it even easier by using shop-bought, pre-rolled pastry.  Well, I'm a busy Mum.  The tart has gruyere in it so it is that classic "cheese and onion" taste - much yummier than the synthetic crisp taste!  We served it with a leafy salad with balsamic dressing and I must say it was a rather delicious and satisfying meal.  Adam ate all of his up.  His little brother didn't even deign to taste it but he's going through a phase and hasn't actually really eaten anything in the past week or so.  I still find it most soul destroying when a child doesn't eat what you have lovingly prepared for them.  They both even sat and watched me make it and asked questions the whole way through.  Oh well - one day I'll show him this blog post and he'll see what he missed. Hee hee.


Recipe - 

Ingredients - 
Shortcrust pastry (About half a packet of pre-rolled stuff)
100g butter
750g onions, sliced thinly
2 eggs
200ml double cream or creme fraiche (I used the creme fraiche and it worked well - wouldn't have noticed the difference)
70g grated gruyere
salt and pepper

Method - 
1. Heat the oven to 190C/375F/GM 5.
2. Roll out the pastry thinly and line a 28cm tart tin.
3. Prick it with a fork and blind bake (Line with greaseproof paper, fill with baking beans, cook at 200C/400F/GM 6 for 10 minutes then lower heat to 180C/350F/GM 4 for another 5-6 mins.)
4. Melt the butter in a heavy frying pan and cook the onions slowly, covered, for about 30 mins.  Stir from time to time to make sure they aren't sticking.  The onions should be soft and pale gold.

5. Beat the eggs with the cream, stir in the cheese and season.
6. Put the onions into the tart, cover with the egg and cream mixture and bake for 30 mins.


Read about this challenge here if you want to join in.

Monday, 14 March 2011

The Daring Cooks' Challenge No. 5 - March 2011 - A Peruvian Meal.

Kathlyn of Bake Like A Ninja was our Daring Cooks' March 2011 hostess. Kathlyn challenged us to make two classic Peruvian dishes: Ceviche de Pescado from "Peruvian Cooking - Basic Recipes" by Annik Franco Barreau. And Papas Rellenas adapted from a home recipe by Kathlyn's Spanish teacher, Mayra.

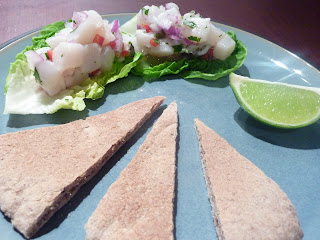
I knew I would love ceviche ( a dish of raw fish marinated with lime juice and chillies) and have actually been meaning to try the recipe for it in Nigella Express for some time.  The Papas Rellenas is also a great dish - a South American version of the mince and tatties we would eat here in Scotland.

So, the ceviche to start.


I used scallops as I had a bag of them in the chest freezer and I love them.  I also diced my red onion and mixed it with the scallops.  I made this at the last minute so the scallops only marinated for 10 minutes maximum and it turned out perfectly.  The next time I will reduce the chillies a little and mince them rather than chop as we got the odd bite that nearly blew our heads off - might have just been a particularly hot chilli.  The texture was amazing - the soft but firm scallops and the crunch of the onions. I could taste the scallops but they were overlaid with the zing of the lime - such a fresh tasting dish.  Next time I will try it with a different fish but I think the scallops would be hard to beat.


Recipe - Ceviche.

Ingredients - 
1Kg firm white fish (scallops or other seafood may be substituted) (must be high quality, really fresh fish) 
2 garlic cloves, mashed
1 chilli pepper, minced
240ml freshly squeezed lime juice (8-12 limes) (NOT bottled lime juice)
1 tbsp fresh coriander, finely chopped
1 red onion, thinly sliced
Salt and pepper to taste

Method - 
1. Slice your fish into cubes.  (The fish is going to "cook" in the lime juice - how thick you make the pieces will determine how much the fish cooks.)
2. Place fish in a non-reactive pan in a thin layer.  Season with salt and pepper.
3. Combine the lime juice, chilli, coriander and garlic.  Pour mixture over the fish.  Stir lightly to expose all the fish to some of the lime juice mixture.
4. Put the sliced onion on top of the fish as it cooks.
5. Let stand for 10 minutes.  
6. Lift fish out of the lime juice and serve.


So, on to the main course - the Papas Rellenas.  This is a very versatile dish and any filling can be used so you can vary this every time to suit yourself.  I actually really enjoyed the filling in this one - the soaked raisins, olives and spices in the mixture made it very tasty.  The eggs were okay but I might leave them out next time as it would help to cut down the number of steps in making this and I don't think I would miss them.  Although some of the Daring Cooks put a whole boiled quail's egg in the centre of their papas and it does look very effective when sliced open.


The papas rellenas were served with a salsa criolla which was so simple to make and a very effectice accompaniment.


Recipe - Papas Rellenas de Carne.

Ingredients - 

For the dough - 
1Kg russet potatoes
1 large egg

For the filling - 
2 tbsp veg oil
250g minced beef
6 black olives, pitted and chopped
3 hard boiled eggs, chopped
1 small onion, finely diced
90g raisins, soaked in 240ml boiling water for 10 minutes then minced
1 finely diced chilli
2 cloves garlic, minced
1 tsp ground cumin
1/2 tsp sweet paprika
60mls white wine, water or beef stock for deglazing
salt and pepper to taste

For the final preparation-
1 large egg, beaten
140g plain flour
Dash cayenne pepper
Dash salt
110g bread crumbs
oil for frying

Method - 
1. Boil the potatoes until the pierce easily with a fork.  Remove from the water and cool.
2. Once cooled, peel them and mash.
3. Add egg, salt and pepper and knead thoroughly to ensure ingredients are well combined and uniformly distributed. Set aside.
4. Make the filling.  Gently brown onion and garlic in oil for about 5 mins.
5. Add the chilli and saute for a couple more minutes.
6. Add the mince and brown.
7. Add raisins, cumin and paprika and cook briefly.
8. Deglaze the pan with the liquid.
9. Add olives and cook for a few moments longer.
10. Add hard boiled eggs and fold in off the heat.

11. Allow filling to cool before forming "papas".
12. Use three small bowls to prepare the papas.  In one combine the flour, cayenne and salt. In the second a beaten egg with a tiny bit of water. Put the breadcrumbs in the third.
13. Flour your hands and scoop up 1/6 of the dough to make a round pancake with your hands.
 14. Spoon a generous amount of the filling on to the potato then roll the potato round it to enclose it.  Repeat with the rest of the potato and filling.


15. Heat 4-5 cm oil in a pan to 175 - 190 C.
16. Dip each papa in the three bowls to coat: first the flour then the egg then the breadcrumbs.

17. Fry the papas (in batches if necessary) about 2-3 mins until golden brown.  Flip once during cooking.
18. Drain on kitchen paper and keep warm in oven if doing in batches.  Serve with Salsa Criolla.

Recipe - Salsa Criolla.

Ingredients - 
2 medium red onions, cut in half and very thinly sliced.
1/2 chilli
1 tbsp vinegar (I used red wine vinegar)
Juice from 1 lime
Salt and pepper to taste

Method - 
1. Soak the onions in cold salt water for about 10 mins to remove bitterness.  Drain.
2. In a medium bowl combine the onions with the rest of the ingredients, season with salt and pepper.
3. Cover with cling film and refrigerate for at least 30 minutes for the onions to macerate and the flavours to combine.

Sunday, 6 March 2011

Wagamama Cookbook - Warm Stir Fried Chicken Salad.


Some might remember my first recipe from this book - the chilli beef ramen which was a delight!

Since then I have also made the zingy warm stir fried chicken salad which was, again, quick and easy to make.


Recipe - 

Ingredients - 
4 boneless, skinless chicken thighs, cut into strips
3 tbsp vegetable oil
for the marinade
1 tsp sesame oil
2 garlic cloves, peeled and crushed
2 tsp fish sauce
2 tsp light soy sauce
juice of 1 lime
2 tsp ground cumin
1 large red chilli, trimmed and chopped
2 tsp toasted sesame seeds
for the salad
2 handfuls of mixed salad leaves
2 tbsp wagamama salad dressing (see below)
2 tsp toasted sesame seeds
1 tbsp chopped coriander
1 lime, halved

Method - 
1. Put all the ingredients for the marinade except the sesame seeds into a blender and blend until smooth, then stir in the sesame seeds.
2. Put the chicken into a dish, pour over the marinade, cover with clingfilm and leaver for at least 2 hours or overnight in the fridge.
3. Heat a wok over a medium heat for 1-2 minutes until completely hot and almost smoking and add the vegetable oil.  Add the chicken, stirring constantly so the pieces cook evenly, and stir-fry for 4-5 minutes until caramelised round the edges and cooked through.
4. Mix the salad leaves with the dressing.  Divide between two plates and scatter over the sesame seeds and chopped coriander.  Top with the chicken and serve with a lime half on each plate.


Recipe - Wagamama Salad Dressing - 

Ingredients - 
2 tsp finely chopped shallot
2.5cm piece of fresh ginger root, peeled and grated  (of course, you leave this out if you have good taste like me!)
1 small garlic clove, peeled and finely chopped
1 1/2 tbsp rice vinegar
1 tbsp water
100ml vegetable oil
3 tbsp light soy sauce

Method - 
Whisk all the ingredients together. 


I think this is a good transition dish.  A nice light, zingy salad with a bit of heat perfect for these slightly warmer days as we start to move from the hibernation and stodgy food of winter.